Note: The NLCD Template project and all data referred to in this tutorial are available on the free NLCD Data Set download.
Welcome to the first in a series of tutorials designed to give you some insights into the usage of the NLCD Template project and supporting data.
For those not entirely sure what a template project is, it is a normal VNS project file that can be specified when you create a new project. The contents of the template file are then included within the new project, but independent of it – editing the template file will affect all projects files in which the template has been specified. Local changes to template-based features will be lost when the project is next loaded, as the template-based settings will be used. There are ways to embed certain specifics into the new project and prevent this behavior, and we shall come to these in a later tutorial.
Before we start to create our own project, let us examine the basis of how this template works. The NLCD (National Landcover Database) is a project that produced ecosystem coverage data for the conterminous United States in the form of raster imagery. The shades in these images each represent one of 22 defined landcover types (one of which is “not defined”). The template file that you have purchased has these ecosystems defined as VNS components, and color-matched to the colors in the NLCD imagery, allowing fast and simple visualization of large terrain areas using real-world ecosystem distribution.
1. Run Visual Nature Studio and Open NLCDTemplate.proj. This should have been copied to a folder called NLCDTemplate in your WCSProjects: path during the install process.
2. You should find very little in this project – Click the Show only enabled items button ![]() above the Scene-At-A-Glance to filter out all disabled or undefined items. If you click through the task modes now, you should find that there are only 2 categories still available – Ecosystems and Image Objects. Expand each of these categories.
above the Scene-At-A-Glance to filter out all disabled or undefined items. If you click through the task modes now, you should find that there are only 2 categories still available – Ecosystems and Image Objects. Expand each of these categories.
3. The image objects consist of those images used as foliage objects or ground overlay textures. The Ecosystems category consists of 21 defined Ecosystems corresponding to the 21 usable NLCD landcover codes. Double click the ecosystem named NLCD 41 Deciduous Forest to open its editor.
4. Click the Rules tab and note that the rules of nature are unrestrictive – since we intend to place this ecosystem with a color map, we do not want Rules of NatureTM interfering with intended placement.
5. Now click the Color Map tab. Note that the Match Ecosystem To Colors checkbox is enabled. In this case, the ecosystem will be located wherever a pixel of RGB 133,199,126 is located in the Color Map. Even though we do not have a color map loaded in the template project, the ecosystems are fully color map-aware and are ready to be used in our own project. Feel free to open and study the settings on the other ecosystems before proceeding.
NOTE: No changes should be made or saved to this template file – if you save a change to the template file by accident, copy the original NLCD Template project from your CD, and overwrite the edited version.
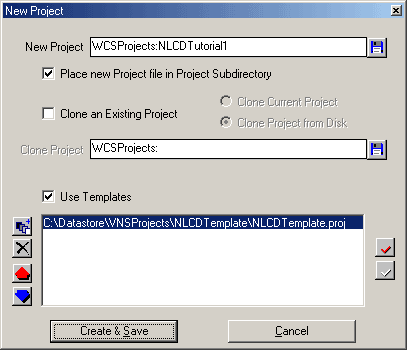
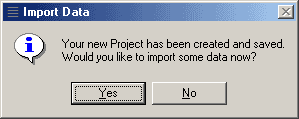
6. Let us start to use this project: Select File>New from the main menu. The new file interface should appear. Enter a name for the project; NLCDTutorial1 will do fine. Click the Use Templates checkbox to select it, and then the Add Template button ![]() to select a new template to add. Navigate to your NLCDTemplate folder and select the NLCDTemplate.proj file. Click Open, and the template should be added to your project definition. The New Project interface should look like this when you are finished:
to select a new template to add. Navigate to your NLCDTemplate folder and select the NLCDTemplate.proj file. Click Open, and the template should be added to your project definition. The New Project interface should look like this when you are finished:
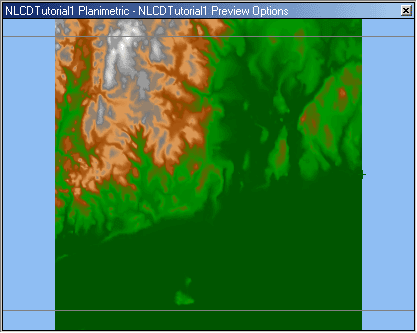
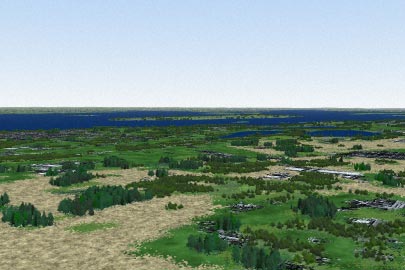
12. Hit F9 or the Render Preview button on the toolbar ![]() to render this view. You should see something like this:
to render this view. You should see something like this:
13. Pretty boring at the moment – Rhode Island doesn’t have enough elevation to make even the plain ground effect look interesting! Don’t worry – we are about to rectify that with some color map wizardry.
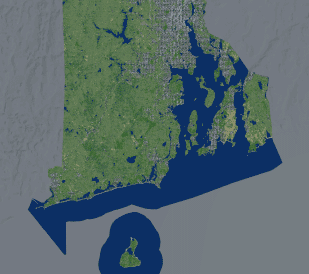
14. Run a copy of your favorite file browsing utility, and navigate to the NLCD CDROM Disk 3. On it you should find a folder called CoverageDataO-Z , in which are the color map files for all states starting with the letters O-Z in compressed form. Select the one named Rhode Island and run it. You should be prompted for a path to extract the file to – point it to the WCSProjects:NLCDTutorial1 folder.
15. Switch back to VNS, and click the Image Object Library button on the toolbar ![]() .
.
16. When the Library interface appears, click the Add Image Object to Library button ![]() to the right of the words Image Object.
to the right of the words Image Object.
17. When the file requester appears, navigate to your NLCDTutorial1 Folder and locate the filerhode_island.NLCD.tif that you extracted in step 14. When prompted to use the new coordinate system for viewing and rendering, say No.
18. Close the Image Object Library – we are done with it for this tutorial. If it is still selected, click the Show only enabled items button ![]() to disable it – we need access to a currently inactive category (Color Maps) which is being hidden by the filter. Click on the Landcover Taskmode button
to disable it – we need access to a currently inactive category (Color Maps) which is being hidden by the filter. Click on the Landcover Taskmode button ![]() , select the Color Maps category and click the Add/Clone Component button
, select the Color Maps category and click the Add/Clone Component button ![]() on the taskbar just above the Scene-At-A-Glance.
on the taskbar just above the Scene-At-A-Glance.
19. A Color Map editor should open for a new color map called Cmap. The Component Gallery will also open, but we don’t require its services at this stage. Close it for now, and focus on the Color Map editor. Pay attention though, because this is where the magic is all going to happen, and it’ll be over before you know it!
20. Rename the Color Map to something relevant like Rhode Island CMap. Click the Image Object drop down list, and select the Rhode Island NLCD image we loaded in step 16. You could create the color map before loading the image, and then select New Image Object… from the drop down list. Since the color map is a GeoTIFF, it would have loaded its georeferencing information whichever way you chose to proceed. Finally, select the Randomize Edges checkbox. The Color Map interface should look like this when you have finished:
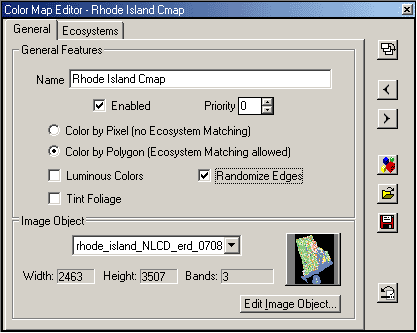
21. Note the following things: Color By Polygon is selected by default, but this is good since we need to match colors in the color map to ecosystems from our template file. We don’t want luminous colors, or to tint the foliage with the colors in the color map, so both the checkboxes for those features are left unchecked. We selected the Randomize Edges checkbox because it helps to break up the square edges of the pixels in the color map – the NLCD image data is 15 meter resolution: 1 pixel in the image is 15 meters on the ground.
Click the Ecosystems tab. Click the Match Ecosystems to Colors checkbox to select it. Click the now-enabled Grab All Ecosystems button ![]() and marvel as the list of CMap-enabled ecosystems from the NLCD template project is autoloaded for you!
and marvel as the list of CMap-enabled ecosystems from the NLCD template project is autoloaded for you!
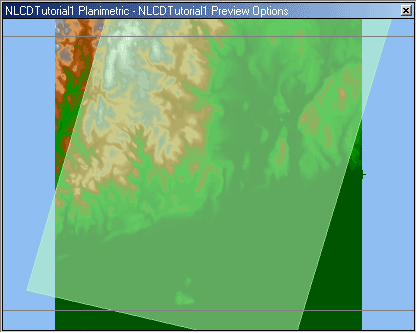
22. Close the Color Map editor and take a look at your planimetric view. You should see something like this: