3DNature

3D Landscape Design & Visualization Software published and supported by AlphaPixel

Menu

Scene Express 2 :: FBX

Getting Started with Scene Express 2

Part 9. FBX Export

Screen captures are from VNS 3.
Scene Express for WCS 6 does not include VNS-specific features.

Notes on the FBX Format

» PNG textures are not supported in all FBX importers. This is a known problem with the FBX plugin for QuickTime.

» Foliage transparency is not preserved in FBX exports. A MEL® script is generated for flipboard foliage exports to solve the problem in Maya.

» Flipboard foliage always faces north and south.

» Interpretation of FBX camera aim, light aim, and object rotation varies among importers. At this writing they only work as intended in Maya.

» Frame rate may be ignored on import (known to be ignored in Maya).

1. Open the Atlantis project from the WCSProjects\SX folder on your hard drive. Save the project as AtlantisFBX.

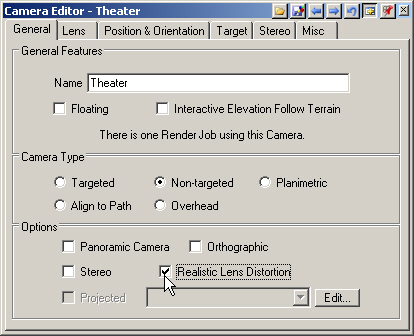
2. To make our camera match in Maya, open the Theater Camera Editor. Show Advanced Options and enable Realistic Lens Distortion.

3. Go to the Lens page and enable Depth of Field and Synchronize Lens and Field of View. VNS will remind you it’s a transient link.

4. Go to the Render Task Mode in the Scene-at-a-Glance and add a Scene Exporter Component.

5. Name it FBX and change the Output Format to FBX. Edit Exports\AtlantisFBX in the Output File field to read FBX\AtlantisFBX. This will create an FBX folder in the SX project folder to hold the exported files. Temporary files will be saved in an Exports folder.

6. VNS Only. Go to the Terrain page. Choose Geographic – WGS 84 from the Coordinate System dropdown list.

7. We’ll export the entire scene with one DEM object with 200 Columns and Rows. That will give us a grid cell size of about 5 meters.

8. We have no LOD options for the FBX format.

9. Turn to the Texture page. This controls the texture draped on the terrain. The Image Format field also applies to the sky texture. Change the Columns and Rows fields to 1024. This will give us a terrain texture resolution of about 1 meter per image pixel.

10. The Foliage, Sky, and Misc page defaults will work fine for this tutorial.

11. Go to the Misc2 page Cameras section and select the Theater Camera and Afternoon Light.

12. Return to the General page and Export Scene Now.

13. This will open the VNS Export Control window. Go to start exporting.

14. VNS will ask you to confirm the creation of new directories in the SX project folder. You won’t get the WCSProjects:SX\Exports window if you’ve already done other Scene Express tutorials.

15. VNS Export Control will let you know when export is complete.

16. Exported files from this tutorial are in the WCSProjects\SX\Tutorial Output\VNS folder on the VNS 3 DVD. The completed project file is in the WCSProjects\SX\Tutorial Projects folder on your hard drive.

16. Your WCSProjects\SX\FBX folder contains all the exported data files.

17. The exported files are in the WCSProjects\SX\Tutorial Projects\FBX folder on the VNS 3 DVD. The completed project file is in the WCSProjects\SX\Tutorial Projects folder on your hard drive.

Produced by Scott Cherba for 3DNature

Scroll to top