3DNature

3D Landscape Design & Visualization Software published and supported by AlphaPixel

Menu

Scene Express 2 :: NatureView Express

A 3D-rendered amphitheater is partially submerged in water near a forested area with rocky hills in the background. The screen shows control buttons and coordinates at the bottom.

Getting Started with Scene Express 2

Part 1. NatureView Express Export

This output format uses the NatureView Express viewer.
It’s available online at https://3dnature.com/NatureView-Full.zip.
It can be freely distributed with your project.

Screen captures are from VNS 3.
Scene Express 2 for WCS 6 does not include VNS-specific features.
Advanced options are described at here.

1. Open the Atlantis project from the WCSProjects\SX folder on your hard drive. Save the project as AtlantisNVE.

A computer screen showing Visual Nature Studio 3D software. The interface displays 3D models, an overhead terrain view, and a database editor with various objects and their attributes.

2. Go to the Render Task Mode in the Scene-at-a-Glance and add a Scene Exporter Component.

Screenshot of the Visual Nature Studio 3.0 software interface with a context menu open, showing options for managing components within the Render Jobs category.

3. Change the name to NVE. The Output Format should already to set to NatureView. Replace Exports\AtlantisNVE in the Output File field with NVE\AtlantisNVE. This will create an NVE folder in the SX project folder to hold the NatureView Express files. Temporary files will be saved in a new Exports folder.

Scene Exporter Editor window with fields for General Features, including Name, Output Format, Output File, and Temp Path. Buttons for "Show Advanced Options" and "Export Scene Now" are at the bottom.

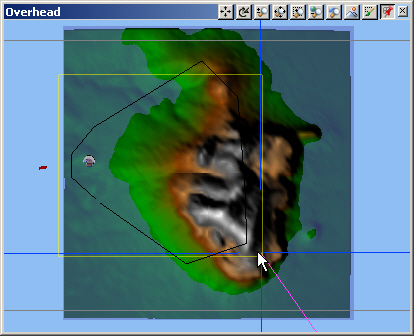
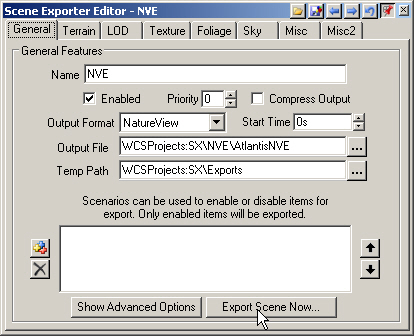
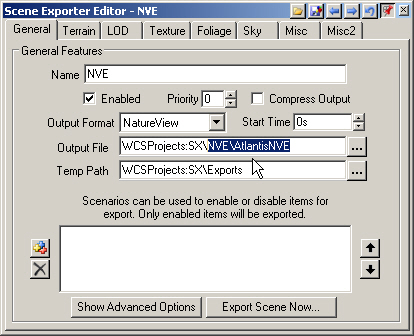
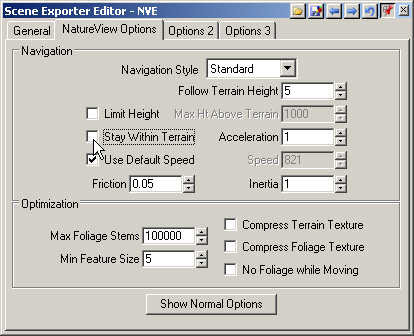
4. Scene Express has useful features to enhance the NVE experience. Select Show Advanced Options ShowAdvanced.gif. The NatureView Options page controls navigation style and settings and optimization. Read more about these parameters in the Interactive Reference Manual. One of our cameras is outside the terrain so deselect Stay Within Terrain.

A software interface for a "Scene Exporter Editor" with tabs "General," "NatureView Options," "Options 2," and "Options 3." Various navigation and optimization settings are displayed.

Insider’s Tip

Stay Within Terrain restricts NVE users to the terrain. This keeps them from flying off the terrain and getting lost. If you export cameras outside the terrain their positions will be moved to the terrain. This will change the camera views, something you probably don’t want to have happen.

If you plan to export cameras outside the terrain and want them to retain their position, deselect Stay Within Terrain. If you want correct camera locations and want to keep viewers safe within the confines of the terrain, make sure all your exported cameras fall within the terrain boundaries you choose for export.

5. The Options 2 page allows you to customize the NVE overlay. Enter SX NVE Tutorial in the Watermark field.

Screenshot of the Scene Exporter Editor window showing various configuration options including overlay, watermark, and metadata sections filled with sample text and fields.

Insider’s Tip

If you add a logo it will replace the Location Map in the lower right corner of the NVE window. This map, with its red arrow for location and direction, is very helpful for users navigating your virtual world.

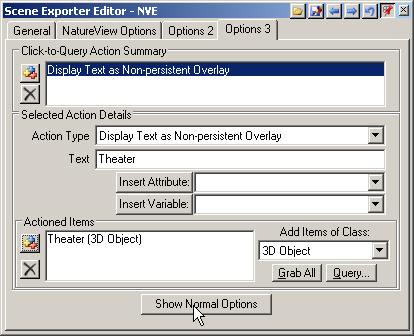
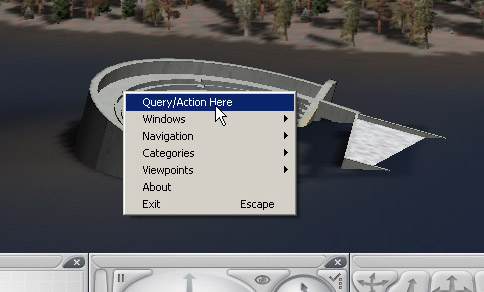
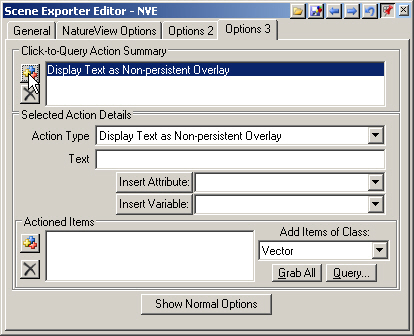
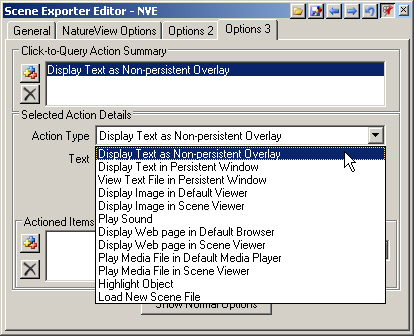
6. The Options 3 page gives you access to Actions. Actions are simply things that happen when a NVE user clicks on a Click-to-Query enabled item. Add AddCloneComponent.gif a new Click-to-Query Action. The Action Type will default to Display Text as Non-persistent Overlay.
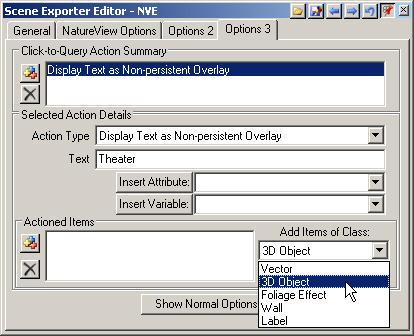
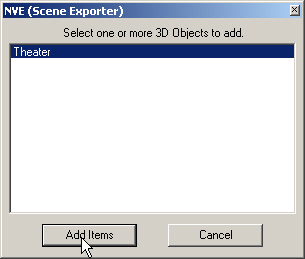
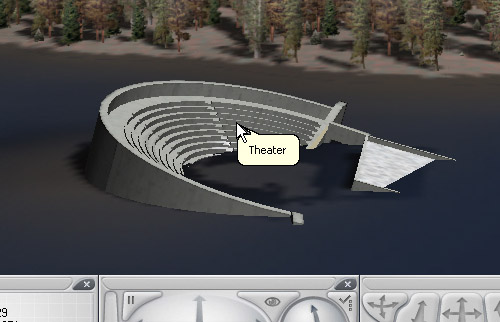
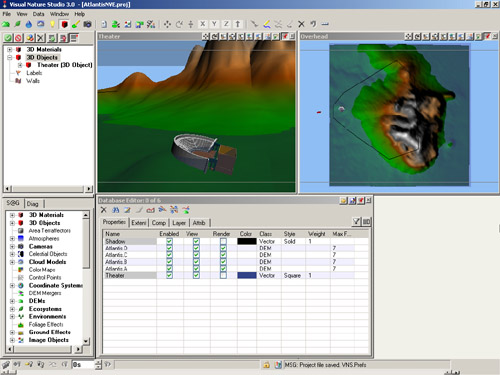
A screenshot of the Scene Exporter Editor with the "Display Text as Non-persistent Overlay" action selected. Various input fields and options are visible, including text, attribute, and variable insertion.

7. Expanding the Action Type dropdown list makes other actions available. Leave the Action Type at Display Text as Non-persistent Overlay.

A screenshot of the Scene Exporter Editor window showing various text display options. The highlighted option is "Display Text as Non-persistent Overlay," with a dropdown menu listing other actions.

8. This action displays text so type Theater into the Text field.

Screenshot of the Scene Exporter Editor window showing options to display text as a non-persistent overlay with the text field set to "Theater" and options for inserting attributes or variables.

9. We’ve told the Scene Exporter what to do when something is clicked. Now we have to tell it what that something is. Expand the Add Items of Class dropdown list and select 3D Object.

A software interface showing a Scene Exporter Editor window with options for adding items like 3D Object, Vector, Foliage Effect, and more. A dropdown menu is selected, highlighting "3D Object.

10. Add Item AddCloneComponent.gif and select the Theater 3D Object.

A screenshot of the NYE Scene Exporter dialog box. It prompts to select 3D objects to add, showing "Theater" in the list. "Add Items" and "Cancel" buttons are at the bottom, with a cursor on "Add Items.

11. This takes care of the advanced options so Show Normal Options.

A software interface titled "Scene Exporter Editor - NYE" with tabs and options for customizing display text as a non-persistent overlay in a 3D object class named Theater.

12. VNS Only. Go to the Terrain page. Choose Geographic – WGS 84 from the Coordinate System dropdown list.

A software interface displaying settings for exporting terrain with options for coordinate system, resolution, and fractal depth. The dropdown menu shows "Geographic - WGS 84" selected.

13. We’re creating an NVE file for realtime use so let’s limit the size of exported terrain to speed viewer response. Set Bounds in a View. VNS reminds us that the next two points clicked in any view will become the new bounds.

A screenshot of the Scene Exporter Editor tool showing various settings for terrain resolution, coordinate system, and boundaries. Options for level of detail, texturing, and other parameters are visible.
A dialog box titled "Set Geographic Bounds" prompting the user to click two points to set new bounds, with "OK" and "Cancel" buttons, and a cursor pointing at the "OK" button.

14. Left-click corners in the Overhead view near these locations.

A screenshot of a 3D modeling software showing an overhead view of a terrain with green, brown, and white areas, suggesting different elevations and land features.
A terrain map view on computer software showing elevation changes with a cursor pointing towards one section. The map includes color gradients from green to brown indicating different heights.

15. The Editor will update with new Top, Left, Right, and Bottom bounds. Increase the Columns and Rows to 512. That gives us a Grid Cell Size of about 1 meter.

Screenshot of the 'Scene Exporter Editor - NYE' interface showing options for terrain resolution, bounds, coordinate system, tiles, grid cell size, and fractal depth settings.

16. Go to the LOD (Level of Detail) page. The defaults will work great for our project.

Screenshot of a Scene Exporter Editor window displaying various settings for Level of Detail (LOD), including distance for LOD transitions, terrain, foliage, objects, and labels disappearance.

17. Turn to the Texture page. This controls the texture draped on the terrain. The Image Format field also controls the sky texture. Leave the Image Format at PNG to maximize image quality. Texture Map dimensions are limited to a power of 2. Use the appropriate increase widget to increase Columns and Rows to 512. Leave the Tiles in X and Tiles in Y values at 1. This gives us a terrain texture resolution of about 1 meter per image pixel.

Screenshot of the Scene Exporter Editor displaying options for texture map settings, including image format, and checkboxes for burning shading and cast shadows into the texture map.

18. Go to the Foliage page and note that Flipboards are selected as the foliage type. 2D flipboard images are more aesthetically pleasing than 3D crossboards and yield higher realtime frame rates.

A screenshot of the "Foliage" tab in the Scene Exporter Editor. Options include exporting foliage, image format selection, max image size, alpha transparency, and exporting labels.

19. The Sky, and Misc page defaults will serve us nicely so leave them alone.

Screenshot of Scene Exporter Editor interface showing Sky tab. Options include Export Sky Features, Export Clouds, Export Celestial Objects, and more, with some checkboxes ticked and value fields.
Screenshot of the Scene Exporter Editor showing various export settings for 3D objects, walls, and vectors, including options for texture size, vector export as geometry, and elevation adjustment.

20. Go to the Misc2 page Cameras section and select the Theater Camera. Select the Afternoon Light and deselect Export Haze.

A screenshot of a "Scene Exporter Editor - NYE" software interface displaying export options for cameras, lights, and haze. The cameras section includes options like Theater and Overhead.

21. Return to the General page and Export Scene Now.

Screenshot of the Scene Exporter Editor - NYE software interface showing fields for output format, output file, and temp path, with buttons for "Show Advanced Options" and "Export Scene Now.

22. This will open the Export Control window. Go to start exporting.

Screenshot of the VNS Export Control window showing various export settings, including exporter, format, options, output, resolution, and procedural settings. A "Go" button is highlighted at the bottom.

23. Confirm the creation of new directories in the SX project folder. The WCSProjects:SX\Exports window won’t pop up if you’ve done other Scene Express tutorials.

A dialog box appears with the message "Path does not exist. Create a new directory?" and options to click "OK" or "Cancel." A mouse cursor hovers over the "OK" button.
A dialog box with the message, "Path does not exist. Create a new directory?" is shown, with "OK" and "Cancel" buttons at the bottom. A cursor is hovering over the "OK" button.

24. Export Control will let you know when export is complete.

Screenshot of VNS Export Control window displaying export settings for NatureView. Includes export formats, options, file name, resolution, priority settings, a procedure section, and an operation progress bar.

25. Your WCSProjects\SX\NVE folder contains all the data files the NVE viewer will need.

A screenshot of a file directory showing folders "AtlantisNVE_3DOs" and "Images" with various file types including ELEV files, NVI files, and PNG images, along with their sizes and modification dates.

26. Launch NatureView Express and open the AtlantisNVE.nvw file you just exported in the WCSProjects\SX\NVE folder.

A file explorer window displaying the "Open NatureView Scene File" dialog. The highlighted file, "AtlantisNVE.nvw," is selected from the folder view. File details include type, date modified, and size.

27. Basic navigation instructions appear in the NVE opening splash screen. Use the h key to list additional keyboard shortcuts.

A digital interface displaying an outdoor amphitheater model in a natural landscape with a control menu overlay. The image appears to be part of a 3D modeling or simulation software tutorial.

28. To check out the Click-to-Query Action feature, use the qkey and click the theater.

A digital rendering of an open-air theater with semicircular seating and a stage, situated near a forested area. A label in the image marks the structure as "Theater.

29. You can also access actions from the right-click menu by selecting Query/Action Here.

A computer screen display shows a context menu with options such as "Query/Action Here" and various navigation commands over an architectural structure in a software interface.

30. Exported files from this tutorial are in the WCSProjects\SX\Tutorial Output\NVE folder on the VNS 3 DVD. The project at the end of this tutorial is in the WCSProjects\SX\Tutorial Projects folder on your hard drive.

Produced by Scott Cherba for 3DNature

Scroll to top
Skip to content